
For businesses that sell physical products, inventory stocktake, also known as inventory counting, plays a central role in effective inventory management. It involves assessing the quantities of goods and materials in a company’s inventory, and offering a snapshot of stock levels to support better decisions and accurate tax reporting.
Watch the tutorial for a walkthrough or read below for step by step guidance.
Four ways to conduct stock takes in NetSuite
1. Inventory count
NetSuite’s native Inventory Count feature allows businesses to perform both calculated and manual inventory counts without the need for additional SuiteApps. Activating this feature enables regular recording of on-hand item quantities, ensuring inventory accuracy. Accurate counts can reduce the need for excessive safety stock, thereby lowering overhead costs.
By setting a count date and interval for an item, NetSuite calculates when an inventory count is due. Additionally, you can classify items to organize and create inventory counts based on your selected classifications.
There are two methods to create inventory counts:
1.1 Calculated inventory counts
In this method, NetSuite generates a list of items that are due for counting based on predefined count dates and intervals. This automated approach ensures timely and systematic inventory assessments.
- Navigate to Transactions > Inventory > Enter Inventory Count > List.
- Click View next to the count you want to start.
- Click Start Count.
- Enter the physical count for each item in the Count Quantity field.
- Click Save.
- After verifying the entered counts, click Complete Count.
- A manager can then approve or reject the count. If approved, NetSuite creates the necessary inventory adjustments to reconcile discrepancies.
1.2 Manual inventory counts
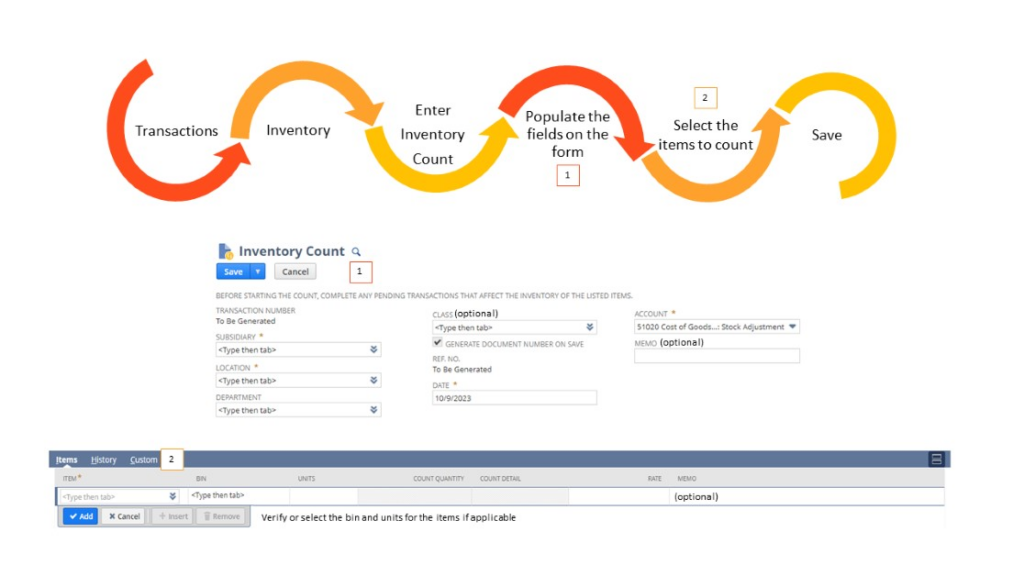
This approach allows you to initiate inventory counts at any time, independent of predefined schedules.
- Navigate to Transactions > Inventory > Enter Inventory Count.
- Select the appropriate location.
- Optionally, enter a reference number and date for the transaction.
- Choose the account to post inventory count variances.
- If applicable, select the relevant department or class.
- On the Items subtab, add the items you wish to count, specifying bins and units as necessary.
- Click Save to record the inventory count with an Open status.
- To begin the count, click Start Count on the recorded transaction.
- Enter the physical count quantities for each item.
- After verifying the entries, click Complete Count.
- A manager can then approve or reject the count. If approved, NetSuite processes the necessary inventory adjustments.
2. Physical inventory worksheet
The Physical Inventory Worksheet in NetSuite is a tool designed to help businesses maintain accurate inventory records by comparing physical stock counts to system-recorded quantities. This worksheet lists all on-hand inventory items and provides a column to enter the results of your physical count. If discrepancies are identified between the system’s inventory count and the actual stock, you can adjust the quantities by creating inventory adjustments.
- Navigate to Reports > Inventory/Items > Physical Inventory Worksheet.
- Click on the printer icon to print the worksheet.
- Perform a physical count of your inventory, recording the actual quantities on the printed worksheet.
- If discrepancies are found between the system’s recorded quantities and your physical count, proceed with inventory adjustments. These adjustments can be made manually within NetSuite or via CSV import.
By following these steps, you can ensure that your NetSuite inventory records accurately reflect your physical stock, aiding in effective inventory management.
3. Cycle count plans
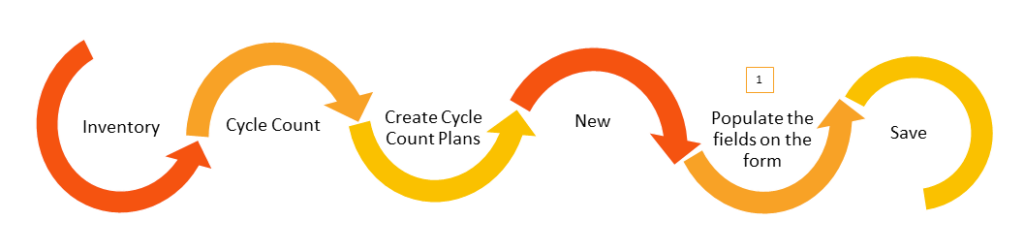
Cycle Count Plans are a feature within NetSuite’s Warehouse Management System (WMS) that allow businesses to create templates for generating inventory counts. These plans offer more advanced filtering options for bins and items compared to manual or automatically calculated inventory counts.
- Using the WMS Warehouse Manager role, navigate to: WMS Inventory > Cycle Count > Create Cycle Count Plans > New.
- Fill in the required fields, such as Name, Subsidiary, Location, and Account.
- Optionally, set additional filters for items and bins to narrow down the scope of the count.
- Save the plan.
- Generate and Release an Inventory Count from the Plan:
- Navigate to: WMS Inventory > Cycle Count > Generate Cycle Count from Plan.
- Select the desired Cycle Count Plan.
- Optionally, set the Count Start Date and Count End Date to define the counting period.
- Click Display to view the list of items and bins to be counted.
- Select the specific items and bins you want to include in the count.
- Assign the count to a user if necessary.
- Click Generate & Release to create and release the inventory count.
- Perform the Inventory Count:
- Access the generated inventory count from the list of open counts.
- Click Start Count to begin.
- Enter the physical quantities counted for each item.
- After entering all counts, click Complete Count.
- A supervisor can then approve or reject the count. If approved, NetSuite will process the necessary inventory adjustments.
By following these steps, businesses can efficiently manage their inventory counts using Cycle Count Plans in NetSuite WMS. This approach ensures systematic and accurate inventory assessments without disrupting regular warehouse operations.
For a visual demonstration, you might find this video helpful:
Note that if you want to do an inventory count for serialised or lot-numbered items, you’ll need to have the Advanced Bin/Numbered Inventory Management feature turned on.
4. Smart Count – SuiteApp option
The fourth approach, not covered in the video up top is Smart Count, an advanced inventory counting option available through NetSuite SuiteApp. Unlike traditional methods, Smart Count allows real-time inventory counting during business hours without requiring operational downtime. It automatically records on-hand quantities when counting starts and alerts users if inventory levels change mid-count, providing greater accuracy and flexibility.
There’s a number of benefits to this approach:
- Real-time inventory updates allow you to count without stopping operations
- Automated on-hand quantity tracking provides instant alerts for quantity changes
- Spot counting enables random bin counts for quality control
- Tolerance settings allow auto-approval of variances within set thresholds
- Blind count enforcement ensures counters do not see expected quantities
- GS1 barcode scanning support improves efficiency with barcode-enabled counting
When to use each stocktake method
| Stocktake method | Best for | Key features |
|---|---|---|
| Inventory Counts | Routine stock audits | Scheduled counts, manual or automated |
| Physical Inventory Worksheet | Periodic full inventory checks | Compare actual vs recorded inventory, manual adjustments |
| Cycle Count Plans | High-volume operations with WMS | Automated recurring counts, bin-level accuracy |
| Smart Count (SuiteApp) | Continuous real-time tracking | Mobile-friendly, blind counts, spot counting, operational flexibility |
Improve your stocktaking with NetSuite and Annexa
Stocktakes are routine tasks that provide the means to maintain precise control over one of your most valuable assets – your inventory. With Annexa as your NetSuite strategic partner in inventory management, this critical aspect of your operations will be efficient and tailored to meet your unique business needs.
Annexa is your trusted NetSuite partner in Supply Chain, Warehouse Management, and Inventory Processing. Connect with us for more information.